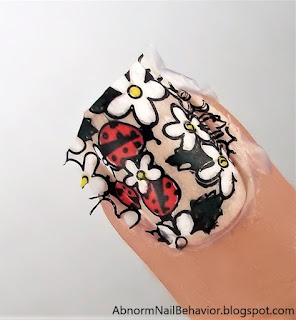
So what the heck is reverse stamping? Glad you asked, because it is my new favorite thing! It begs the question: "How did you do that?". Let me show you!
Reverse stamping is layering polish to color in stamps, and then turning them into colorful decals. It is a little more on the advanced side, but practice always make perfect. I promise, it's not as hard as it looks.
I picked this daisy and lady bug plate because I wanted to demonstrate a multicolored design, and it has a ton of great detail.
Above is the difference between just plain stamping and reverse stamping. The nails on the left are the same design as the nails on the right, but the difference is amazing.
In the past, I have always colored in the design after it was on my nail. I could never stay in the lines so it just wouldn't look as clean as I wanted. After trying this, the plain design is kind of boring and flat to me, and coloring in from the top just looks messy. Did someone say Stamp Snob? Your nails will look undeniably better with this method.
The nude is China Glaze - "Don't Honk your Thorn." It has a subtle shimmer and is wonderfully creamy and opaque in just two coats. Find it here. It's the perfect background to a brightly colored decal.
I started with nude accent nails and a red and black polka dot french using Stamping Plate M-26.
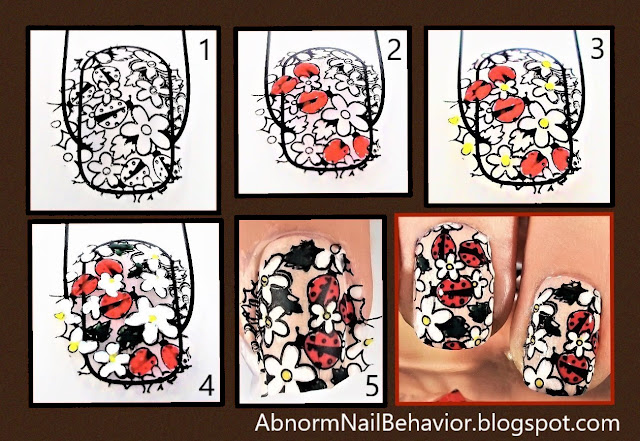
Now lets reverse stamp! It's best to pick a design that has open empty spaces you can color in. I used Born Pretty Daisy BP-X38.
You can buy a silicon mat made specifically for making nail decals here, or used a ziplock bag like I did for my feather nails in 2013 here... How to make a Feather Decal.
You need to start with a coat of clear polish for the stamp to adhere properly. I used Nail-Aid 3 Minute Gel Coat, but I learned the hard way that not all top coats work for this. Seche Vite (my all time favorite) stuck to the rubber stamper when I placed the design and started peeling off as it dried on the mat. No bueno.
After the design is dry, put down another coat of clear polish to seal it into its own little dimension. This prevents streaking later when you add color. I personally like to do a layer of clear after each step. It just keeps everything from mixing with whats underneath it.
To fill in the color, I used Migi Nail Art Pens on this one. I usually prefer to whip out my dotting tool or a toothpick and use regular polish. It works best with one coat colors that are really pigmented and opaque. Nail art pens are fun, but they don't come in as many colors as you likely already have in your nail polish collection.
The best part is that you don't have to stay perfectly in the lines, because you already have clean lines on top of the color your adding from behind. You're basically painting your nails backwards, because the first layer is actually going to end up on the front of the decal. How flippin' cool is that!?


Once your beautiful nail decal is dry, apply clear polish to your nail. As soon as it's tacky, put your decal on top. I trim off the excess with scissors. Go over the decal with a soft makeup brush to get out any bubbles and insure the decal is pressed against the wet polish all over the nail. After the decal is set, I use my handy dandy eyeliner brush and acetone to carefully brush away any of the decal on my skin and clean up the edges. Top coat and done.
That's all there is to it... an endless supply of personalized decals made for practically nothing.


No comments:
Post a Comment
Tell me what you think and share your thoughts with the rest of the AbnormNail crowd...